


Mateo and his wingman bring a great vibe since their release. With explosive utilities, Mateo is perfect for aggressively taking over entry sites and supporting the team. If you enjoy this playstyle, Gekko is the agent for you, and this guide will help you get started.
Several months have gone by, yet the ultimate Gekko Main has yet to surface. Accompanied by reliable allies, Gekko is renowned as an aggressive Agent and the trickiest when it comes to the Spike.
Gekko's Abilities Demystified
Globules
Gekko never leaves his friends behind; thus, whenever he deploys Wingman, Dizzy, or Thrash, he can retrieve them by interacting at the collision point. Clear the area, reclaim your allies, and have them back at your side. However, there's a 10-second cooldown before reusing them once reclaimed. The Globules remain on the ground for 20 seconds after being deployed (only once).
- You love to binge-watch a good series? Feel free to check out this free Amazon Prime Video trial !
Ability C - Mosh Pit (Cost: 250 Credits)
Mosh Pit functions similarly to an incendiary grenade, spreading and dealing damage 3 seconds after impact. Use the Fire key for a regular throw, or the Alt-Fire key for an underhand toss.
The inflicted damage varies based on the radius. Being within the Outer radius results in 25 tick damage, while the Inner radius causes 50 damage. After the initial 3 seconds, remaining within the Outer circle incurs 3 ticks of 25 damage, totaling 75 damage. For those within the Inner circle, the damage escalates to 150.
After testing #Gekko here is some info about abilities:
— Ivan Shevtsov (@JohntaOfficial) March 6, 2023
Mosh pit:
- Kills KJ ultimate, even through thick walls;
- Kills full hp/armour opponents;
- Less damage if you are farther from its centre.
- Damages around 80% to doors on Ascent and a Flower door on Lotus.
#VALORANT pic.twitter.com/TwHUd3VMlG
The ticks of damage are not instantaneous, and if an Agent is within the Outer circle, they may experience 1 or 2 ticks depending on how quickly they escape the Mosh Pit. It's crucial to note that Mosh Pit affects everyone, including Enemy Agents, Friendly Agents, and even Gekko himself. Therefore, be mindful not to harm your teammates, as we all know how toxic things can become in such situations.
- It's finally here! Did you already get your copy of Diablo IV ?
Ability Q - Wingman (Cost: 300 Credits)
Gekko's loyal companion, the Wingman. This ability sets the stage for cunning plays and astonishing spike defuses or plants. It offers three uses:
- Concuss - When thrown using the Fire button, it travels in a straight line, seeking out enemies. Once it detects an enemy, it rushes towards them and applies a 2.5-second Concuss effect.
- Planting Spike - To use this ability, ensure that you have the spike in your inventory. With the Alt-Fire button, you can send your wingman to plant the spike on your behalf. Make sure you have a clear view of the planting area ahead and enough range for your wingman to complete the mission. If successful, great! However, if your wingman is eliminated during the process, the spike will drop where they were downed.
- Defusing Spike - Again, you need a clear view of the spike. Equip your Wingman and use the Alt-Fire button to send them forward to defuse the spike. They will run towards the spike and attempt to defuse it.
wtf gekko wingman pic.twitter.com/ZpLopaQXit
— Xzi (@xzi_ow) May 30, 2023
After being thrown, the Wingman will search for enemies for 5 seconds before disintegrating and becoming available for pickup. However, this time limit does not apply to Defuse or Plant commands. As mentioned earlier, enemy agents can shoot and eliminate the Wingman in any of the above scenarios. To down the Wingman, they need to deal 100 damage.
Signature Ability - Dizzy
Dizzy is another valuable asset in Gekko's arsenal. It serves as a potent tool for engaging sites. When thrown into the air, Dizzy has a 0.5-second windup time before hovering for an additional 2.5 seconds.
During this hovering period, Dizzy emits blasts towards enemies in its line of sight, causing them to be blinded for 1 second. However, enemies can easily shoot and eliminate Dizzy since it only has 20 HP.
Ultimate Ability - Thrash (7 Ult Points)
This Ultimate ability in Valorant is often considered unfair, as seen on multiple streams. When you activate Thrash, you take control of it, while your Agent remains idle until you finish your task with Thrash. You can guide Thrash through enemy territory to do the dirty work for you.
Once you spot an enemy, you can click the Activate hotkey to make Thrash lunge forward and explode in a small radius. Anyone caught within the radius will be DETAINED for 6 seconds, which can be extremely frustrating for opponents. Thrash has a 0.6-second windup, lasts for 6 seconds, and has 200 HP, meaning enemies can shoot at it.
Fun Fact: Gekko's own Thrash can detain him pic.twitter.com/eOX3uA3KMC
— Andrew (@DarthTVs) March 7, 2023
How to Play Gekko?
Understanding how Gekko's abilities function is essential before proceeding further in this guide. Playing as Gekko requires a touch of creativity to fully utilize his utility kit. On the Attacker side, his primary role is to swiftly and efficiently make initial entries for his team. This means you should not hesitate to use your resources right from the start.
Defending with Mateo can present a challenge as you often find yourself torn between saving your Wingman or using it and preserving your abilities. While watching a video showcasing Wingman's capabilities may get you excited to pick Gekko, it's essential to focus on his complete kit rather than solely relying on Wingman.
NO. ONE. TOUCHES. MY. WINGMANNNN #gekko #RiotCONquest #SeeYouInTheSkies pic.twitter.com/1WCXiTSkfH
— spotify: maloemalhen (@maloemalhen) June 3, 2023
Using Wingman as a tool to distract and reveal your enemies' positions is the key approach for both defusing and planting. Enemies are unlikely to let Wingman interact with the spike directly, but their response will expose their whereabouts, giving you a significant advantage.
Gekko excels in one-on-one engagements, as all of his abilities, except Mosh Pit, can tilt the duel in your favor. A single concuss, a brief blind, and the powerful 6-second DETAINED effect can help you come out on top in clutch situations.
Best Maps for Gekko
Gekko currently holds a 49.5% win rate in competitive mode, with a 3.9% pick rate. While these stats may appear modest, considering his recent release, they are fairly decent. Statistically, Gekko performs well on maps such as Fracture, Pearl, and Heaven. However, this does not mean he is ineffective on other maps. We will provide a brief guide on playing Gekko on a few specific maps.
How to Play Gekko on Ascent
Ascent is an open map, which poses challenges for Gekko. The tight corners and narrow corridors make it difficult to retrieve your abilities safely, putting you at a disadvantage as an agent reliant on them. On Ascent, Gekko can leverage Mosh Pit in post-plant scenarios by deploying allies against enemies during site retakes.
Another use of Mosh Pit is clearing corners during attacking rounds. Locations such as Wine, Heaven, and Under-Heaven, as well as B Logs, can be cleared for your team's advancement. Remember that Mosh Pit cannot be retrieved like your other abilities, so use it strategically.
How to Play Gekko on Fracture
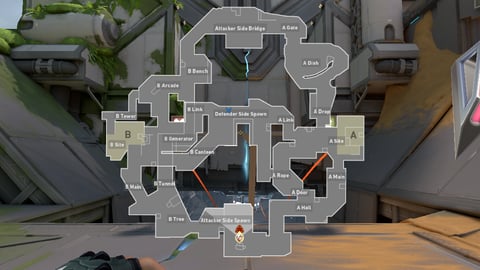
As mentioned earlier, Fracture is THE MAP for Gekko. It compensates for what Ascent lacks and offers abundant opportunities. Gekko thrives on defender-favored maps, and Fracture, with its design, allows you to turn it into your personal playground.
When defending, there are several key positions you can hold for your team:
- On B site: Arcade, Canteen, and Generator
- On A site: Drop, On-Site, and Main
Executing textbook defense is all you need to do here. Maintain your position and apply pressure to the enemies using Dizzy or Wingman. Fast enemy pushes can be thwarted with Mosh Pit, and your objective is to inflict sufficient damage while your team rotates to support.
When attacking, prioritize A site as it allows you to easily clear pathways with your utility and retrieve them later. If you are familiar with the strategic lineups, save your Mosh Pit ability for the post-plant situations.
How to Play Gekko on Pearl

Pearl is another map that feels like home to Mateo. With its long areas, tight corners, and hallways, Gekko thrives in this environment. One of his strengths on this map is the ability to throw Dizzy and Mosh Pit through obstacles where enemies often seek refuge. This makes Gekko a valuable offensive option.
When deciding which area to isolate with your Mosh Pit, consider these spots:
- B Tower (if it's safe)
- B Hall
- Mid Doors
- Entrance on A Link
- Dugout
- Flowers
These are the areas where opponents typically position themselves to engage. When defending, make the most of the tight corners and exploit them. On B, you can effectively hold Link and Mid Doors, while on A, you can control the area around Link and the Site. That wraps up this article, and we hope it assists you in your journey to master Gekko and crush your enemies into a state of tilt.
Never before played a Diablo game and not sure if you should start with Diablo IV? We think you should!